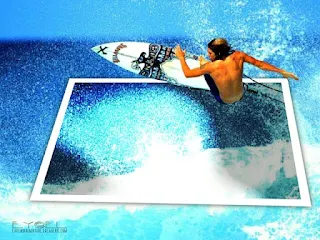
Got a new operating system (Linux) and a new image editing software (GIMP). Even though I'm still using Paint Shop Pro on Wine, I want to learn how to use this much-praised multiplatform tool. But it takes time for, like many free alternatives to giants such as Photoshop and MS Office, it was designed by geeks who can't really put themselves into the average user's shoes who, in turn, may be too busy perhaps to take the time to thoroughly read a user guide. That's the way things are and no-one is perfect. So I wanted you to know that I'm actually making the effort and starting to really enjoy GIMP.
As always, the tutorial below may be done with any basic graphic tool. It's quite simple yet requires some dexterity depending of the areas you'll choose to detour and therefore presuming you're already familiar with this technique. Another challenge might be to find suitable pictures which may be time-consuming. Luckily, I have a large stock which I have organised in databases with XnViewMP, another multiplatform tool (though unavailable in official Linux repositories).
 |
 |
Material
- a picture featuring a well-contrasted element to be partially detoured and enough space around to fit in a frame
- optional: a background image
Instructions
1. Open a copy of the image you want to manipulate.
2. Apply Layer - Transparency - Add Alpha Channel menu command (Paint Shop Pro: Layers - Promote Background Layer).
3. Add a new layer and fill it with white.
4. Select all (Ctrl+A) then apply Selection - Reduce menu command (PSP: Selections - Modify - Contract) using value between 10 and 15 pixels depending on the original size of your picture. Press Del key then Select None (Maj+Ctrl+A - PSP: Ctrl+D). Your picture now has a 10-15px white border.
5. Use Perspective Tool (PSP: Deform Tool - Free Mode) to warp and reduce the size of the border frame as you like and so that your chosen subject may stick out.
6. Activate your original background layer. With the lasso (Freehand Tool), draw around the area you want to keep. You may zoom in to make sure you do that as thoroughly as possible and choose the Add To Selection mode to proceed in instalments with complex and intricated shapes.
7. Once your selection is complete, apply Layer - Mask - Add Layer Mask menu command with Initialise Layer Mask To Selection option (PSP: Layers - New Mask Layer - Show Selection). Now the unwanted parts are all hidden.
8. Activate the white border layer and using the lasso, select the areas overlapping your subject and press Delete.
9. Select None and Merge All Visible Layers. You may then add drop shadows and a background layer as you wish.
NOTE: In the above example, before merging layers I've tweaked the colours of my original picture to fit with the tones of my chosen background plus a series of enhancements including applying Darken and Sharpen Tools in some of the grassy areas. You may skip the layer mask part by inverting your selection and pressing Delete but note you may not be able to modify anything after that, whereas layer masks can conveniently be edited.
 |
 |
For this second example, I have duplicated the original layer to use it as background layer and worked on the duplicate layer. After the detouring step, I've selected the inside of the central frame which I floated then unfloated to a new layer and applied various filters before duplicating it and changing layer blend mode. Before merging, I applied a drop shadow to the white border only.
So now you know how to create some relief and make even your most common pictures real stand out.
© La Pensine Mutine. All rights reserved. Reproduction prohibited.


 FR
FR


No comments:
Post a Comment